Showing posts with label food preservation. Show all posts

Solar food dryer failure!

I've had a couple of spectacular failures with the products of the solar food drier recently. Since this is how I learn, and one of the reasons I chose to keep this blog, here I humbly share my failings.

The cloudy color in this jar of prunes is grain moth silk:
Prunes ruined by grain moths

Grain moths, curse you! We have them in our kitchen and it seems like they've always been here. I partly blame the rye crisp crackers we kept in the lower kitchen cabinet for the last two years. It's odd how rye crisp tends to keep even in the paper wrapper. It's not amusing, however, to discover what a wonderful food source these Swedish crackers are for grain moths. I suspect they crackers were the launching pad for a very healthy population in our kitchen.

The grain moths tend to get into everything eventually but I thought that my hard-earned horde of dried fruit was secure for a couple of reasons. First it was dried fruit and as such protect by being desicated and containing a concentration of fruit sugar. Larvae would prefer starchy flour and similar items, not dry and sugary fruit. Quite the opposite, they thrived in it. Ugh!

I first noticed a problem when I found little dark spots in the morning hot cereal. No, that's not random fruit fiber. It's grain moth larvae poop. I only figured this out after finding a moth floating in the bowl.

At the bottom of this jar are little brown granules of insect droppings.
moth poop

The second problem was that the moths got into a number of jars I had falsely assumed were well sealed. Here is the lesson: Do not trust new one-gallon pickle jars! I had been collecting them from the backs of restaurants. I liked them because they seal (or so I thought!) They are clear, so you can see what's inside. And they are large which makes them practical for storing food in bulk.

Here's a photo of a jar with the modern commercial quarter-turn lid:
Jar lid

The problem with this type of lid is that you simply can't tighten these down enough by hand to keep them air-tight. A good test to check if a jar will seal properly is to fill it with water and turn it upside down. If it leaks then it's suspect. Of course I only figured this out after my disaster.

All told, I lost about one and a half gallons of prune and about a quarter of a gallon of dried Asian pear and apple. Normally a few moths here and there don't bug me, but this fruit got infested really thoroughly really quickly.

My lesson here is to stick to classic half-gallon canning jars. The classic Mason jar requires over 360 derees of rotation to seal. This may provide better leverage to get a tight seal with the lid. At one point in time, gallon jars were made with this type of lid. It was a nice jar standard and the country is that much poorer that we don't have these readily available to use anymore. I now have to buy expensive half-gallon Mason jars. I don't like this but at least they seal properly.

The other fruit preservation failing was with a small batch of figs I dried. I discovered a neglected but fantastic fig tree near my work downtown. (The quality of fig trees really seem to vary from tree to tree.) The fruit was falling on the ground so I decided to "liberate" the tree from waste and do some help-myself gleaning. Here I think I didn't dry the fruit enough and they molded in the jar. Next year they'll get a better drying even if they get kind of tough and leathery.

I had to wait for a free weekend to take photos of the moldy figs since I'm at work when it's light out. During this time, the jar mysteriously ended up in the driveway. It appears to have become a science experiment of our daughter, Greta. Not sure what the appeal of mold was but that's what happened with it.

Moldy figs

I guess it is pretty impressively fuzzy. Thank goodness she didn't open it inside.

Father's Day sauna tale, the urban muk'eevik


In a blog where I write about the good life of solar showers, soaking and saunas, it is important to explore the origins of my interest in this subject. For Father’s Day, here, I share the story of my father’s steam bath, its origins and the important influence it had on my own enthusiasm for a good sweat. (Thank you, Dad!) This particular sauna is where I learned my love for the activity. It remains to this day my all time favorite and not just because of the memories. It has more to do with its character, its proper proportions, patina and location as an urban Alaskan sauna.

The specific details of the steam bath’s origin are a little obscure but I can offer an outline. For starters, I should note that this was constructed to be a proper Alaskan “steam,” not a fussy and sometimes overly austere and minimalist Finnish sauna. I use the two terms interchangeably but favor “steam” over “sauna” for a variety of reasons. An Alaskan steam is different than a sauna. Really it is more like a Russian banya, with more water. It is its own unique creature that has historical antecedents in mining/fishing/logging camps, the Russian colonial period and native traditions.

Dad was inspired to undertake his backyard steam after spending time in the Yukon-Kuskokwim Delta area of Alaska. In the late 1970s Mr. McCabe worked as a contractor to the villages of Naknek, King Salmon and Dillingham. He was the hired gun to either clean up or establish property tax rolls for these villages. In this part of Alaska there is a deep tradition of steams. Many folks have them outside their houses in the native villages. In Yupik they are called muk'ee. “Muk'ee” means bath and “vik” house.

The McCabe steam was converted from an old shed. The shed came from an equally old small house in the working class neighborhood of Fairview in Anchorage. The shed was probably built in the 1920s and is constructed out of whatever the builder could get his hands on, spare boards and even doors. One side looks like it was made of recycled tongue and groove doors. There is even an old keyhole cover and escutcheon plate for an old rim lock door strike mechanism still attached to one of the old door-now-siding pieces. The above photo would have worked better if I had taken it horizontally which would show better how this is a door laid on its side. (If you look closely the slots on the screws of the two plates are still aligned, all vertically, at least in relation to the door.)

The doors and other siding appear as if they might have had some use in the railroad. The Alaska Railroad was headquartered, and has its repair yards, not too far away.

To start the project, the shed was moved to the backyard of our house off of K Street. I remember a bunch of my dad’s friends helped lift the shed over the cinder block wall in the alley and set it in place on top of a wood platform in the back yard. There was lots of grunting, and yelling at me to stay out of the way and to watch my fingers.

Then came the very long process of finishing the interior. There wasn’t a heck of a lot of work to be done but it took a number of years. I helped out a bit here and there. I remember evenings in the backyard with dad puttering away on the project. The garage door would be open. He had a Craftsman radial arm saw, peanut butter jars full of nails and a constantly-full coffee mug of low-grade red wine. We listened to the relatively-new-at-the-time local public radio station, KSKA. I remember listening to salsa, blue grass (incredibly popular in the state at the time) and even a locally-produced gay and lesbian talk show. For the time--I’m guessing around 1977--it must have been politically loaded especially for a small state like Alaska, but then again, Alaska was far less conservative then than it is now.

Up went the insulation, the plastic sheeting and rough-sawn boards for the ceiling. The walls and benches were redwood. Even then they were expensive. A perennial cheap skate, Dad took great care not to mess up his cuts. When he did I heard about it.

The effort to do this finish work slowed to a crawl. Some work would get done and then it would sit for months. From start to finish the project may have taken two years to complete. Once it was done there were a few parties where friends, particularly those who helped move the shed, were invited to steam. Then, maybe kind of like the family boat, it didn’t get used so much.

We were in Hawaii on vacation, I’m guessing in 1978 when my parents took a phone call from the hotel. The tenants who were living in the family’s basement apartment called to say that there had been a fire in the steam. Someone had lit it, presumably to use it. The sauna got too hot and it caught on fire. The tenants discovered it burning and called the fire department. The interior was pretty uniformly charred. It was a sad sight with much hard work lost.

The fire also drew some attention from the authorities. The shed did not meet lot line set back requirements and the wood stove was certainly much too close to the interior walls. We may have received a letter from the city about this, but after a while the violations were forgotten. The steam sat in it’s burned state for a year or so and then Dad set about rebuilding it. Charred wood, particularly from a house fire, can have a very unsettling smell to some folks. In spite of this, my father’s approach to restoring things was to simply flip the charred redwood boards. Those boards cost a lot of money, you know. At the time I was a little appalled. For three or four years the sauna retained the strong burned wood smell but eventually it went away or at least blended into all of the other aromas of a good steam. I look back on this now and appreciate the burned wood actually. The fire in the steam might be considered as if it went through a conditioning stage. Like primitive Finnish saunas and Native American sweat lodges, the room is first filled with smoke from an open fire. Then it's opened up to clear the smoke before people enter to sweat. The smoke aroma is part of the experience.

When I was in high school, the steam bath was used more frequently with friends. It wasn’t until my brother’s generation arrived that the steam really got a regular workout and I more profoundly learned to appreciate the virtues of the steam/sauna.

My brother Michael, largely in cooperation with one particular friend, Paul Adasiak, had sauna parties with his high school friends. All long-time Alaskans, they may not have experienced many other Alaskan saunas or steams, but they intuitively understood the vital role a good steam plays in lifting spirits in a dark cold winter or how it was an excellent way to appreciate the glory of the endless Alaskan summer sunset.

During college I spent a year living in Anchorage. At this time my brother’s crowd began having more frequent sauna gatherings. I would tag along. I have to admit, sometimes I found them a little unsettling. Here were late-teenage boys in the throes of teenage-ness. There was alcohol, shit talking, hair-brained philosophizing, high energy and passion, but mostly we had a lot of laughter and fun.

Michael and Paul, were unabashed hedonists and they took their hedonism to new levels. Certain rituals evolved from their own peculiar form of steaming. They would cook for a while then the water came out. First on the rocks. Then it would be slowly and sensually poured down neighbor’s backs. Folks would scrub each other’s backs with loofa pods. Almond-scented Doctor Bronner’s castile soap was popular for some reason. The steam sessions were mostly young men but they were almost always coed. The evening often would end in a large group shower inside the house where people would soap each other down and rinse off. I used to joke it was like a softcore porn party. As far as I know, no one ever got overly aroused (or, ahem, turgid) but it was little too far-out for me. Predisposed to being reserved and uptight, I would sit the showers out.

Still, one of the reasons I appreciate the steam bath so much is that it is an express train to sensuality. I live in my head a lot and the steam is a very sensual, physical experience. It helps ground me back in the world of physical sensation. I bet this is a reason why it is so popular in Finland. The Finns are notorious for being uptight and reserved. Perhaps the sauna is a pleasurable way to forcibly compensate for a national tendency towards being uptight? At any rate the degree to which my younger brother's crowd took their pursuit of relaxation and pleasure taught me a lot. And it was the frequency of these guys using the sauna that conditioned me to acquire a taste for the steaming habit.

After college the steam bath sessions turned into a more mature crowd. I'd fire up the sauna about once a week. There was a regular crowd of friends. It was a fantastic way for people to get caught up with each other's lives. Sometimes the conversations were mundane. Sometimes we'd voyage into uncharted philosophical territory. During this period the steam was more of a salon of good conversation.

As mentioned earlier, Dad's steam was an urban Alaskan steam bath. It was built very much influenced by native village muk'eevik and cabin saunas but it is located not far from downtown Anchorage in a relatively dense residential neighborhood. The steam opens up out onto the back alley. It was always convenient for a friend to drive or bike up in the evening. They could just roll up, strip down and join in. We’d often all pour out and run up and down the alley to get the circulation moving. It was fun to dive into a snow bank or roll down the grassy hill in the yard opposite the steam. 

We could stand outside, drinking beers, steam rolling off our bodies, and watch the traffic go down the busy L Street artery. Occasionally this would surprise a hotel guest, looking down at us from the nearby Inlet Towers, or an unsuspecting driver going down the alley.

Like my backyard sauna in Portland, Oregon, it’s great to take a primordial experience with smoke and fire and sensuality and drop it into an urban setting. There is something liberating and revolutionary about being this free in the middle of the city. It’s not the shock value but being in a completely different and somewhat heightened (or at least altered) physical and mental state in the context of cars, pavement and houses.

In the early days, Michael and I steamed with Dad and his friends. Later there were times when Dad would come down to visit while we steamed. He steamed with us once in a while but I think the conversation got a little too rambunctious. It was great to have him sit around for a bit, maybe drinking a beer with us while we cooled off outside. I’m sure he enjoyed seeing the sauna well-used and appreciated. We thank you, Dad, for the vision to build an Alaskan steam in your backyard.

Too bad neither Michael nor I live in Alaska to continue its regular use. For now we need to focus our attention on making repairs so it doesn’t deteriorate. The rolled roof is completely missing in some places and water is coming in around the chimney.

Strawberries dried, first drying of the season


Last weekend was a busy one. Saturday the family drove out to Sauvies Island for some U-pick strawberries. We came back with about 45 pounds! With strawberries you don't have a lot of time after they are picked before they go bad and we didn't have a lot of room in our refrigerator. They either need to be eaten (always a viable option!) or preserved pretty quickly. Becky, super woman, dove into action and started canning. With a little help from me and Greta, she cranked out a huge quantity of canned strawberry jam!

I used our berry bounty to take the solar food dryer out on it's maiden voyage. Today, Monday, I harvested the strawberries out of the dryer. Overall it was a success. I did have some observations that are worth sharing about the dryer. (One of my intents with this blog.) As mentioned earlier, I built two solar dryers based on plans from Eban Fodor's book The Solar Food Dryer.

Some notes on the trial run of the dryer
Saturday was an overcast, cooler day and it was late afternoon by the time I had all of the strawberries cleaned, cut up and loaded on the screens. I was able to grab some late sun to get the dryer up to around 110 degrees but that didn't last too long. I was paranoid about fruit flies. We are in the midst of a gigantic fruit fly bloom in our compost, about eight feet from the dryer, so I needed to maintain a higher temperature in the dryer to discourage the flies. I was forced to plug in the dryer over night. It was a little discouraging doing so for the first use of the dryer but the circumstances made it necessary.

The dryer worked. The scent of the drying strawberries was wonderful but it quickly developed significant condensation problems. The night was cool and lots of water built up on the inside of the glass. The strawberries probably retained a lot of water from being washed and they are inherently pretty water-laden anyway. Moist air hitting the cold glass surface caused big water drops to accumulate. Some of the water ran down the inside of the glass and dripped on the screen at the back of the dryer. Maybe a possible solution here is to put a blanket over the glass at night. This would help keep the glass warmer and probably improve the efficiency of the dryer.

One problem I discovered with this dryer is that I forgot to install any screen in the top ventilation door. Oops! This needs to get fixed since keeping bugs out of the dryer, especially when drying sweet stuff, is important. For this batch, I tried to keep the vent door closed as much as possible to keep the flies out by limiting access and maintaining a higher temperature. This meant that I wasn't able to evacuate the moist air as quickly as desirable. I noticed that mold even built up by the side vents. Welcome to Oregon. This is not acceptable. That vent door needs to get fixed!

Comments on drying strawberries
It's weird how there is so much variation in the taste from one strawberry to another. This makes me a little undecided how much I like them as a drying fruit. Some of the first berries I tasted had an odd sort of chemical taste (acetone-ish?) to them which I think is related to the speed and temperature of the drying. (I'm sure there is some food science explanation for this but it's beyond me.) I don't seem to notice this taste as much now. Other berries were absolutely dreamy. The drying concentrates the flavor, making the berries tangier, sweeter and more "strawberry-y" tasting.

We tried some in our Cream of Wheat this morning. For hot cereal, I think I still prefer plums but maybe the berries need to cure in the half gallon mason jar for a while. One problem with the solar dryer is non-uniform drying. A few weeks in the mason jar will help the berries cure to a uniform consistency. Right now some are chewy and some are crunchy. The crunchy ones take a bit too long to soften in the hot breakfast cereal for optimal eating, though as-is I prefer the over-dried crunchy ones for snacking. I have a tendency to over dry fruit. I'm still not very confidant how well partially-dried fruit will stay preserved. This will take some trial and error.

I read some of our old 1970s drying books for information on drying strawberries. These books heartily endorse strawberries as a good drying fruit. One important tip is to place the berries skin-side down otherwise they have a tendency to really get glued to the screen. I was a bit haphazard with my berry placement and some did turn out to get pretty stuck. By pressing up from the underside of the screen, I was able to get the berries free. Still it took a bit of extra effort. The more the berries were dried the easier it was to release them from the screen as they tended to snap off. Some of the less dry strawberries smeared as I was taking them off. Maybe extra dry is the only viable way to dry strawberries?

One book suggested to cut berries into half inch pieces. This is a little vague. Next time I'll stick to simply halving them and quarter the particularly large ones. Quartering rather than slicing prevents a flat fleshy inside surface from getting stuck to the screen. A quartered piece still has some outer skin to put face down.

The two trays, fully loaded with berries, yielded about two pints of dried fruit. Strawberries shrink considerably when dried! We produced these just in time to replace our exhausted supply of plums, though really we should be eating the real thing, fresh strawberries!

And that's probably more than you'll ever want to know about drying strawberries.

Miner's lettuce


Last year, a little too late in the season, I discovered that we have miner's lettuce growing in our front yard. Becky knew about miner's lettuce from Girl Scout camp in California. She taught Greta and me about it when we saw it at a farmer's market. Miner's lettuce is so named because it was the first edible plant to pop up in the spring. It has important vitamins and helped miners stave off scurvy, or so the myth goes.

It took me a while to put it all together and realize we have a nice patch of our own and it's actually pretty tasty, nothing like eating other common weeds like eating bitter dandelion.

My theory is that it arrived here long ago transplanted along with a Douglas Fir tree that my friend Tom McRoberts brought with him when he visited us. About 12 years ago Tom did a brief stint working in a tree nursery for the Washington State Forest service. I asked Tom if he could score us some Doug Fir seedlings. He brought us three. One was planted in our front yard and is quickly growing to be way too large for the space. (What was I thinking planting it here?!)


I suspect that this patch hitched a ride as a seed in the small bit of soil that came with the tree. Alternatively, the shade and soil conditions created by this tree helped a latent patch take root.

I need to poke around the neighborhood and see if I can find it elsewhere. I haven't seen any elsewhere though. It made for a great addition to last night's dinner salad.

Guerilla fruit trees


Yaaaarr! Pirate fruit trees.

Over the past year, I’ve been planting fruit trees in the back lot of a neighboring apartment complex across the street from our house. The ownership of this group of apartments and commercial buildings has changed hands a few times over the years, moving from one non-profit to another. Custodianship of the property has been virtually non-existent and the landscaping is currently maintained be a property management company whose sole orientation is “mow and go.” Therefore I’ve taken it upon myself to liberate the land and plant some fruit-bearing trees for the family and the neighbors.

About three years ago a long-time neighborhood resident and friend helped me plant the first tree in a barren island between the parking lot and sidewalk in the rear parking lot. It wasn't a fruit tree but this effort did lead to my current project. I had expressed to my friend how naked and uncared-for this area was. I told her that I wanted to plant some trees in this area to create a visual break between the residents and the commercial buildings and to provide some shade and greenery for the neighborhood. My friend took the lead here and said she had a tree we could plant. It was a Zelkova Serrata, a tree that is often used as a replacement to the American Elm. The Asian Zelkova is related and, though smaller, shares the elm's characteristic of having a gracious and large canopy.

The first tree took a lot of work because the soil was mostly rocky gravel. We spent an afternoon clipping up tree branches by hand that had been left over from a neighborhood clean-up. The clippings worked as a soil cover/mulch. We dug in further compost material and later planted a tree. It took some effort to protect the tree from the landscapers since they had a proven track record of bumping lawn mowers into the trunks on the trees, effectively scalping the bark off the base of the trunk and killing the trees.

After some reckless haphazard watering on my part, the tree seems to have established itself and we are beginning to see inklings of a gracious shapely tree.

The property was redeveloped about ten years ago. With the exception of a great old barber shop and a wholesale record distributor, pretty much everything else in the entire block was boarded up. In the redevelopment, ginkgo trees and other small shrubs were planted along the property’s parameter. Within a year pretty much everything was dead. Those trees that didn’t die from lack of water (I did make an effort to help here but was too late) eventually died from having the bark scalped at the base of the trunk by careless lawn mowers scraping them. It looked awful. Over the years. I did my share of pulling out the dead trees to remove the eye sores.

My friend was my tree planting teacher with this project. She led me through putting up a wire fence around the base of the tree to help protect it from urban deprivations: lawn mowers, cats, kids and bicycles.

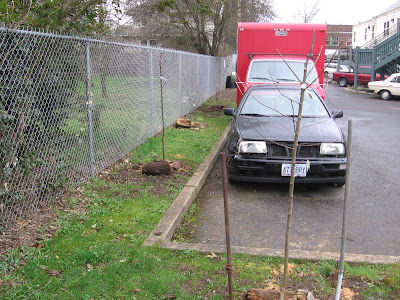
Here's a photo of the fence we built to protect the tree:


I want local accessible fruit for eating and preserving. We’ve done a fair bit of canning over the years. I’ve pressed apples and pears for juice, cider and peary (aka pear-based hard cider). Recently I’ve experimented with food drying. The apartment complex across the street has a long length of planting strip that runs along the entire block-long section of the south lot. It's about three feet wide. The ginkgo trees planted here ten years ago have long since died so this is where I’ve been working on sneaking in fruit trees.

So far I’ve planted four fruit trees. Last year I planted a French plum. (Some sort of free-stone plum that I don’t know much about.) This winter I added an Italian plum, a russet-type apple and a Rainier cherry. The last three trees all came from Earth’s Rising Nursery. I ordered them on faith from a catalog that I found at our local coop grocery. The catalog had no email or website listed. I sent a check in on faith and the trees arrived without incident. The trees were bare root, packed in saw dust. This is not something I’m used to. I’m only familiar with planting trees with a soil root ball. Apparently this is not too uncommon and the trees, so far, seem healthy enough. They are even budding a little.

Digging and planting for the last two trees, Greta and I noticed some interesting things. We dug up old (broken) soaker hoses that had been grown over by grass and weeds. The hoses were intended for watering the failed trees and other landscaping that went into the area when the property was redeveloped. Also we were able to take advantage of some of the pre-amended soil from when the ginkgoes were planted. The last two trees that we planted ended up being in more or less the same areas as the ginkgoes so we had some good top soil instead of gravelly soil to work with.

Since it is the first day of spring, there really isn’t too much to show for the planted trees. The photos didn’t turn out that well because there isn’t much to look at. In a few years, with luck, I’ll have some better photos!

Going down the row, starting from the tree in the foreground on the right, there is a russet apple, Italian plum, French plum and a Rainer cherry.


Here's a photo of my own kid/lawn mower defense:


I used rotting log ends that didn't make it into the sauna in time. The posts are steel pipe that I picked up in another neighborhood that were left on the street for scrap. (I was good and left the good copper and aluminum for someone who probably needed the scrap metal money more that I did.)


Second solar food dryer finished!


About a year ago a subscription issue of Homepower Magazine arrived at our home. One of the stories was about a solar food dryer. (Issue #199, page 58) I pine for an opportunity to do proper solar in our home but for various reasons--mostly siting and financial--it hasn't been practical. The solar food dryer was a solar project I could afford and accomplish and it fit well with my interests. I share it here because I haven't seen many web photos or discussion of this particular dryer and maybe I can offer some of my own experiences with its use later during the harvest season.

Our inner Northeast Portland (Oregon) neighborhood is filled with old turn-of-the-century fruit trees. We have none in our yard but we (my daughter, Greta, and I) forage off of neglected trees in vacant and commercial lots and overhanging branches. Over the years I've put up a fair amount of fruit but canning gets to be a hassle after a while. It's time consuming and labor intensive. Canning fruit, from start to finish, can take up a weekend and sometimes it only happens if a free weekend falls when the fruit is ripe. With plums in particular you need to put them up shortly after picking them. You can't put them in a box and forget about them like you can with apples.

For the past few years we've been drying a lot of plums in a garage-sale-found electric food dehydrator. The electric dryer works well but it is noisy and it does add noticeably to our monthly electric bill, maybe $10 extra for a month.

Dried plums, aka PRUNES, are the bomb. Say "prune" and all sorts of unpleasant associations are conjured up. As a youngster, I drank the better part of a full jar of prune juice in one sitting. I can attest to the unbelievably effectiveness of prune juice as a bowel mover. It gave me hours of gut wrenching pain on the toilet.

Prunes or dried plums however are pretty much like any other dried fruit and don't deserve the same rep as prune juice. They're sweet and flavorful. They keep well and make a fantastic snack or additive to things like oatmeal and baked apple crisps. Portlanders used to understand the incredible urban agricultural value of of the free-stone Italian plum. They are all over the place here and mostly the fruit goes to waste.

When life gives you plums make pluminade!

The solar food dryer seemed like a big enough project that I would get a better return on my investment in time if I made two instead of one. The idea made sense since I only had to dig my table saw out from the garage a few times for the extra effort and I would have less waste if I bought material for two dryers instead on one. After purchasing the full book (the HP article doesn't have the complete plans), The Solar Food Dryer by Eben Fodor, I finished one dryer last year mid-summer, as a gift for a friend. I figured she needed it sooner than I did. (She has a huge garden.)

I've finally gotten around to getting number two done.

Here it is looking down on the dryer, like the camera is the sun:


Below is the rear of the dryer with the doors open and the screen drying trays partially pulled out.
A bit of construction detail
I deviated from the plans a bit by adding extra bubble foil insulation on the very bottom piece of plywood (under the spray-painted black sheet metal "collector plate." I also added standard kitchen aluminum foil on bottom front and back plywood pieces. With the aluminum foil, I glued it onto the plywood with spray adhesive, a trick I learned in a kid's workshop for making cardboard solar cookers. (We'll see how it holds up.)

You can also see that I stapled the bubble foil insulation onto the lower sides of the dryer. Below is the kitchen aluminum foil (on the left of the photo) glued to the front plywood section of the dryer. Just to the right of this is visible a thin section of the bubble insulation that is glued and stapled to the bottom.
Mr. Fodor recommends the foil insulation on the larger back door of the dryer as a performance upgrade to get more drying time later into the season. He suggested using foil tape. I've taken this idea a lot further. The question is will the dryer be too hot now in the summer? I'm starting to get a little nervous about this.

I built the dryer with his suggested electrical back-up of two standard 200 watt incandescent light bulbs. These are to help get drying done on cloudy days or later in the fall when there is less sun. The bulbs I found were 130 volt commercial-service bulbs. The box states that at 120V (more like regular house current) the energy used is 176 watts. Nevertheless when the dryer is plugged in and the vent doors are closed, the internal temperature pretty quickly reached 160 degrees! I suppose with the extra insulation I could use a lower wattage bulb. Is there such a thing as a 150 watt bulb?

A few general comments about the design:

One thing that made me nervous in the plans was the placement of the light bulbs in the bottom of the dryer. The 200 watt bulbs seemed too close to a piece of wood that supports the dryer's bottom section of plywood. Mr. Fodor's suggestion to limit the fire risk was to apply aluminum tape to the wood below the bulbs. My method was to wrap the support wood a few times in foil. (I didn't have any foil tape.) I stapled the foil onto the wood. I like having a few extra layers of foil to provide some air insulation between the foil and the wood.

To help move the the bulbous part of the bulbs away from this wood, I mounted the porcelain sockets on an additional section of plywood. This help give a bulbs another 1/4 inch of clearance from the wood. I mounted the sockets as close as possible to the metal collector plate so that the bulbs are almost touching. This might help dissapate some heat. Now that I see how well the extra insulation works, maybe I can get away with lower wattage bulbs? This would save electricity and add a margin of safety to the design.

The book suggests that the exterior of the dryer can either be painted or coated with linseed oil to provide some protection from getting wet in the rain. I coated the plywood ends and the exterior in shellac. I'm a fan of shellac because it is natural and easy to work with. The solvent/liquid medium for shellac is denatured alcohol, pretty benign stuff compared to other chemicals and solvents. I'm not sure how well the shellac will hold up outside in direct sunlight. I've read that one method of sealing shellac from UV degradation is to coat it with old-school (floor?) wax. I may wait to see how well the shellac holds up for a season before trying this. Alternatively, shellac is so easy to work with, maybe if is begins to fail I will just slop on another coat?

Now all I need is something to dry! Another challenge will be figuring out where to store the dryer. It's a bit big and our yard space is limited. If I can talk Becky into sewing a rain cover, it might work well on our flat garage roof. If that doesn't happen I'll hoist it into the attic.